What are Mobile Forms in DataMyte
Mobile forms are a digital version of a paper form or document using DataMyte Digital Clipboard Workflow Builder. Fields or records contained on your paper form can be included in the DataMyte Digital Clipboard digital workflow, which then can be accessed by Revolution device or web to collect data. Additionally, you can design a digital workflow that can capture text input (like paper forms do), and collect images, and audio/video, etc. DataMyte Digital Clipboard Workflow data can be submitted and stored in the cloud. The data is available to be shared or viewed in real-time.
Types of Forms
- Inspection Workflow
- Audit Workflow
- Customer Lead Workflow
- Certification Workflow
- Compliance Checklist Workflow
- Incident Reporting Workflow
- Data Collection Workflow
- Pre-Inspection Workflow
- Proof of Delivery
- Dispatch Workflow
- Proof of Visits
- Invoice Workflow
- Work Order Workflow
- Asset Management Workflow
- Asset Capture Workflow
- Routine Checkup Workflow
Workflow Builder Types of Inputs—Capture Data using workflows
- Basic: Textbox, Date, Choice List, Yes/No
- Media: Pictures, Audio, Video
- Advanced: Barcodes, GPS Location, Signature
Enhancing Usability of Forms Created by Workflow Builder
Validations
Validations can be performed using different conditions. Validation of one input can depend on the values of other inputs from either the same workflow or on the values of forms filled by previous users.
Visibility Conditions
A widget can be made visible or invisible depending on the value of other input values from either the same workflow or on the values of forms filled by previous users.
Sub Workflows
Sub Workflows allow Workflow Builder to make a lengthy and complex workflow shorter by combining related inputs in a separate workflow. This makes it easy to navigate to different widgets within such a workflow.
Power Features Used in the Workflow Builder
By using Parent-Child Relationships and Reference Relationships, the capabilities of the Workflow Builder are enhanced and data from one workflow can be used in another workflow.
Parent-Child Relationships
Some objects have parent-child relationships with each other. These objects are represented as forms in the Workflow Builder and their relationship is modeled using parent-child relationships. This type of relationship can be understood better using the example of an Airport and its constituent runways. An airport is a parent workflow while a runway is a child workflow. So, an Airport can contain zero or more runways. During the submission of a workflow, you can enforce the allowed number of children using the validation feature inside forms.
Reference Relationships
One object can be associated with or referenced through another object. An invoice, for example, can refer to a customer to whom the invoice is addressed.
Workflow Builder Overview
- Create an App
- Click Create Workflow—Type New Workflow name (this is the name user’s will access on Revolution device or web)
- Click Create Workflow—Workflow Builder window displays (Optional—watch the tutorial by clicking on video icon in upper right)
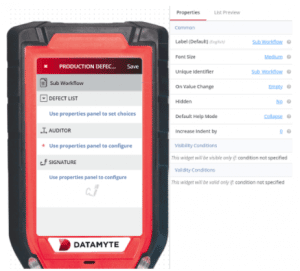
- Workflow Builder window displays—this is your design workflow space
- Left—displays two tabs: Widgets (basic widgets) and Advanced (advanced widgets); Middle—displays Revolution mobile device and Right—displays Properties
- The widgets (boxes) on the left are dragged with your mouse cursor and dropped to the Revolution mobile device screen in the middle. The widget will display on the Revolution screen. Add different widgets similar to your paper workflow.
- Set Properties of the individual widget—select the widget and the Properties options for selected widget display to the right of the screen. Example—drag Text Box to Revolution device. The field “Required” displays in the Properties. Change the “Required” field to ‘Yes” to make this mandatory. The field displays an asterisk.
- Click Advanced—optionally, drag and drop Advanced widgets and set Properties
- When all widgets have been added and properties set—click Save in the top right to save the workflow
- Click Publish—top right to publish the workflow and begin using to collect data on Revolution device and/or web.