Use Toggle widget in your workflow to create Yes or No options. To include Toggle widget, drag Toggle (left pane) to the middle pane and drop. A Toggle in your workflow is similar to the Choice List widget. The main difference is the Toggle widget contains only two options—Yes and No.
Toggle Widget—Properties
Default Value
Default Value default value is No. Default Value property displays a drop down list and includes No or Yes. Example—you might create a toggle for a question like ‘Are you from California?’ The user while filling the workflow will select either Yes or No.
Toggle Widget—Common Properties
Toggle Widget Common Properties include—Label, Font Size, Required, Unique Identifier, On Value Change, Hidden, Value Display Mode, Default Help Mode, Increase Indent By, Visibility Conditions and Validity Conditions. Reference Text Box Widget—Common Properties for definitions and examples
Visibility Conditions Example—you might create a Toggle ‘Are you from California?’ which will be only visible if the user chooses ‘Yes’ option in the earlier choice list ‘Are you from USA?’ Visibility conditions can help you control the type of input during the filling of a workflow by the user.
Validity Condition Example—you might create a Toggle ‘Do you use a tablet?’ which will be only valid if the user enters ‘Yes’ in the same field. Otherwise, it would be invalid and show an error message: “This survey is only for tablet users.” Validations can help you control the type of input during the filling of a workflow by the user. You can also customize an error message that you want to display by typing the message in ‘Validity Error Message.’ This message will be displayed when the validity condition does not match with the given input.
What is a Recreational/Military Ammunition Manufacturer
Company Again Aims for Olympic Gold with Updated Quality System
This Midwest manufacturer is a supplier of ammunition for the U.S. Olympic Shooting Team, and also has numerous government defense contracts. Although 100% in-process inspection would be impractical in its high-volume production plant, the company has instituted sophisticated data collection of SPC information for each type of ammunition (shotgun shells; .22 caliber rim-fire; and high-caliber, center-fire rifle and pistol cartridges) and “load” made. Twenty SPC workstations, running Quantum SPC software from DataMyte, gather data from extruders, die machines, and loaders, which add the actual shot and gunpowder to the cartridges.
Problem
Although length, diameter, and sidewall variation are critical measurements for ammunition, the most important quality factor is shot and powder weight. An ever-increasing number of setups to cover the varying sizes of ammunition loads in different shells required a sophisticated SPC data collection and analysis system. The company began using DataMyte 953 data collectors and TurboSPC software in the early 1990s. But the company wanted to update it’s in plant network and databases at the same time it switched from DOS the the Windows operating system.
Solution
The TurboSPC network was replaced with DataMyte Quantum SPC/QA software. In addition, as new data collection stations are added, desktop computers run Quantum SPC/DC at the data collection point. Eventually, all the DataMyte 953 workstations will be replaced by computers running Quantum software.
“Powder and shot weight checks take place throughout a typical shift, and the data are collected via PC and distributed through a PC local-area network,” said the company’s senior quality control engineer. “Our quality philosophy is zero defects, and we’re trying to keep our misfire rate in the low parts per million,” he added. “Our government contracts also specify a misfire number that we can’t exceed. If too much shot or powder is added, the gun could explode. Not enough, and you’ll have ‘bloopers.’”
In-process measurements are a larger part of the company’s plan – to integrate SPC information with computer-integrated manufacturing (CIM) and CAD data throughout the plant. “Our goal is to build a perfect shell every time, with no scrap, and to use the minimum of raw materials, said the company’s network systems analyst.
With the help of data-collection software, they are already tracking real-time good vs. scrap rates for each ammunition loader. The company’s goal is to establish system-wide tracking for shot shells, .22 caliber cartridges, high-caliber, and center-fire ammunition.
“Eventually we want to get to the point where real-time quality measurement, CAD specifications, and the raw material used in each design can be tracked in case of recalls or other liability problems,” the analyst said. “We want to be able to track incoming shot, powder, brass, etc. so that we’ll know from SPC data what lot of raw material was responsible for any bad ammunition – that’s not easy when you’re talking about millions of shells and cartridges manufactured each day.”
Faster, better measurements are allowing manufacturers to check quality in small working quarters, over a wider range of products, and with more data distribution capability than ever before. Although the carefully collected and analyzed data are a life saver it defects occur downstream, most manufacturers see in-process gauging and data collection as a way to help produce better quality in the here and now.
What is the Third Party API Support
Data Collection
DataMyte Digital Clipboard mobile app works in-sync with the DataMyte Digital Clipboard server. Your custom business app containing your forms and actions to automate your business processes are designed and developed using the DataMyte Digital Clipboard platform using simple drag and drop features. Once the app is set up, it is published to mobile devices and you can start using it right away.
When you collect data using this app, the data gets synchronized with the DataMyte Digital Clipboard server. This data can further be processed and analyzed to get real-time business insights to make data-driven decisions for your business.
API configuration
The third-party API configurations need to be integrated with the app after developing it using the DataMyte Digital Clipboard platform. So, when the app is published, the server knows how it needs to handle the data and which system it needs to integrate with.
App Data Export API format:
Url: ‘https://your.domain.name/getAppData’
Method: POST
Authentication: Basic
Request header:
{
“content-length”: “663”,
“accept-encoding”: “gzip, deflate”,
“accept”: “*/*”,
“content-type”: “application/json”,
“authorization”: “Basic dXNlcm5hbWU6cGFzc3dvcmQ=”
}
Request Body:
{“customer_name”: “[\”James Smith\”]”, “inspection_remarks”: “Everything looks good”, “comments”: “This is a test report”, “date”: “2020-05-09”, “part_serial_no”: “P865”}
Step by Step Tutorial on How Action Designer Works
Custom Action
Custom Action allows you to customize the action associated with a workflow in your app. A custom action is used to modify the app and the functions it performs as per your own business requirements or use cases.
The process to Create a Custom Action
Step – 1: Go to the Actions section and click on the Custom Action tab to create a new action
Step – 2: Select the particular workflow for the action and name the action
Please note that you can only create an action once you have created at least one workflow in the app using the Workflow Builder. An action cannot be created if you don’t have any workflow associated with it.
Step – 3: You are ready to design a customized action
DataMyte Digital Clipboard actions designer allows users to design multi-step actions by dragging and dropping action steps onto a designer canvas (dotted space represented in the middle of the screenshot 3) and then connecting the steps together in a chronological sequence.
Step – 4: Assign specific properties to the different widgets used in creating the list of actions and save the actions
When the sequence of actions executes each step runs after the previous step is executed. Select basic or advanced widgets for your actions and assign each widget specific properties in the right-hand side panel of your action designer. Once you are done, click on the save tab and your customized actions becomes active.
You can even deactivate your customized actions by clicking on the deactivate tab. This tab can be accessed by going to the list of customized actions displayed. Status of the actions are displayed as active or inactive. You can even delete an action by selecting the delete option displayed in screenshot 5 below.
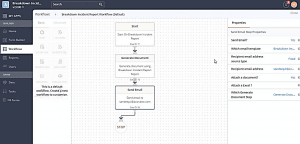
Default Action
A default action is automatically created once a workflow has been created in the DataMyte Digital Clipboard Platform. The default action cannot be changed and to change it, a customized action needs to be created. A default action is displayed in the screenshot below and can be used to understand the process associated with a particular action by the execution of the specified tasks.
Basic Action Widgets
Start Widget
The start widget triggers the start of the action events, like in the case of an asset or an action workflow, the action starts when a new site is created with the asset workflow or when an inspection is performed on a site, which relates to an action workflow.
Stop Widget
The stop widget is used to end the action events after all the processes in it have been executed.
Advanced Action Widgets
Decision Widget
The decision widget is used to decide which path to go to based on a previous value entered in a workflow. For example, in a workflow documenting medical test information of a respondent, if the respondent indicates a positive response for a particular question, then a particular set of processes will be executed in the list of actions. If the response is negative, then another set of processes will be executed in the list of actions. The decision widget helps in determining which path needs to be chosen and a particular path is executed depending on the response recorded.
Call Rest API Widget
This widget is used for calling a third-party API; like some third-party systems provide export rest API, through which they access request from any other source and this request has a certain format, and data is received in this particular format and this data can be accessed and handled the way you want once you accept the request.
Using the Call Rest API, the DataMyte Digital Clipboard platform can route data collected through the forms directly to the data management system of their customers, like a CRM system. For example, if any customer is using our app for lead generation and they are capturing lead information from the forms created by the DataMyte Digital Clipboard platform, and they want the collected lead information to go directly to their CRM instead of using the DATAMYTE Digital Clipboard Drive, we can configure their API and the collected data will be sent directly to the system of their choice.
This is used mostly by established companies already having an existing system of data management, and they don’t want to shift to the DataMyte Digital Clipboard Drive, but just want a data collection tool. So, in this scenario, we ask them to provide their API for the purpose of integrating their app and they can get the data directly in their existing system. DataMyte Digital Clipboard uses standardized and globally recognized call rest API systems and this enables us to integrate with any third-party system.
What are the Generic Action Use Cases
Action Use Cases (Generic)
Sequential Actions
Sequential actions are linear and progressive, and this type of action list goes from one task or process to another and does not step back in the sequence. Used in manufacturing or a production line task.
State Machine Actions
State machine actions is more complex than sequential actions and may step back in the sequence if a dependency dictates it. These actions go from one ‘state’ to another ‘state’. Used in software development or in content creation.
Rules-driven Actions
Rules-driven actions are higher-level sequential actions in which the action progress is determined by the rules. They use conditions to decide if expressions are ‘true’ or ‘false’ and the rules are modelled with the ‘if’, ‘then’ or ‘else’ expressions. Used in projects that have clear goals, but varying levels of specifications or rules.
Types of Action Steps
User Step
A user step assigns a task to the user and involves the user filling a workflow and its submission. When the task is assigned, the user gets a notification on their phone. When the user responds to the notification, a mobile workflow is presented to them. This is one of the mobile forms designed using Workflow Builder. A user has the option of filling up the workflow and then submitting it. A user can also reject the task of filling the workflow if the information is incomplete or for any other reason.
System Step
A system step is performed by the DataMtye Digital Clipboard platform. Typically, system steps are executed instantaneously and the action proceeds to the next step. Examples of a system step are sending an email, generating a document, performing custom processing among others.
What is the DataMyte Digital Clipboard Actions Designer
About Actions Designer
The Actions Designer is used to design sequences of actions. By using the drag and drop functionality, steps are added and configured in the list of actions. By using Actions Designer, users can design multi-step actions and connect the steps together in a chronological sequence. During the execution of the actions, each step runs after the previous step is executed. Data collected by mobile forms is first validated and can be routed to the following entities using actions.
One or more email recipients
A PDF or a Word document
Any of your existing software systems
Third-party cloud software like CRM or Asset Management system
You can combine any number of above steps in any order. Data routing is finalized by configuring the action and can be automatically routed to the specified entity mentioned above every time a mobile workflow is submitted.
Action Use Cases (Generic)
Sequential Actions
Sequential actions are linear and progressive, and this type of action list goes from one task or process to another and does not step back in the sequence. Used in manufacturing or a production line task.
State Machine Actions
State machine actions is more complex than sequential actions and may step back in the sequence if a dependency dictates it. These actions go from one ‘state’ to another ‘state’. Used in software development or in content creation.
Rules-driven Actions
Rules-driven actions are higher-level sequential actions in which the action progress is determined by the rules. They use conditions to decide if expressions are ‘true’ or ‘false’ and the rules are modelled with the ‘if’, ‘then’ or ‘else’ expressions. Used in projects that have clear goals, but varying levels of specifications or rules.
Types of Action Steps
User Step
A user step assigns a task to the user and involves the user filling a workflow and its submission. When the task is assigned, the user gets a notification on their phone. When the user responds to the notification, a mobile workflow is presented to them. This is one of the mobile forms designed using Workflow Builder. A user has the option of filling up the workflow and then submitting it. A user can also reject the task of filling the workflow if the information is incomplete or for any other reason.
System Step
A system step is performed by the DataMyte Digital Clipboard platform. Typically, system steps are executed instantaneously and the action proceeds to the next step. Examples of a system step are sending an email, generating a document, performing custom processing among others.
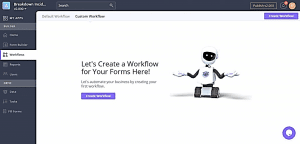
What are the other Workflow Functionalities
Drag & Drop
For all the widgets to be used or added in your workflow, you need to drag the widget from the left panel and drag the same to the digital mobile screen in the middle.
Save
Save option helps you save the workflow that you have created. Once you save the workflow, it can be published and used in real-time by users for data collection and other purposes.
To save any workflow, click the blue button on the top right of your ‘Workflow Builder’ screen.
Draft
The Draft feature can help you to save the changes that you make in your workflow. But you cannot publish a workflow which is in a ‘draft’ mode. You need to save the workflow to publish the workflow and use it.
You will find the Draft option besides the ‘Save’ option at the top right of your ‘Workflow Builder’ screen.
Cancel
Using Cancel option, you can remove all the unsaved changes done in your workflow.
Only the previous saved changes will remain.
You can find the ‘Cancel’ option on the top right screen of your Workflow Builder besides the ‘Draft’ option.
Workflow Properties
To access workflow properties, you will have to click the name of the workflow on the top of the digital mobile screen in the middle of the Workflow Builder screen. Once you click the name of the workflow, the properties will open on the right panel. There are two properties which open:
Workflow Name: You can type the workflow name here to change the name of the workflow.
Parent Workflow: You can set a parent workflow to your existing by using this property.
Customize
If you click on the Workflow Builder from the menu on the left panel, a screen will appear with all your forms. Below each workflow, you will find a ‘Customize’ option. Use this option to open your existing forms, and then you can make changes into those forms.
Delete
On each workflow that you have built, you can see three dots on the top right (On the Workflow Builder screen). If you click these dots, then you will find Action & Delete option appear. Delete option will help you delete the workflow that you have chosen.
Publish App
You will find the Publish option on the topmost bar of the screen. Publish will help your forms available for the use on mobile or web. Without publishing the app, you cannot make the workflow functional or your new changes are not included in the workflow.
Publish for Test
If you are set to publish the workflow in the app that you have created, there will be two options that emerge. Publish for Test will help you to check all the changes that you have made in the workflow. This will allow you to fill up an actual workflow through mobile or web, and also submit the data. If the changes don’t reflect the way you want, you can quickly go back and make new changes and Publish for Test until it works the way you want.
Publish Version
Once you are done with all the changes, you can then hit ‘Publish Version.’ This means you can start using the workflow on mobile after the version has been published. But, if you still have changes to make in the workflow, then you will have to create a new version – and then make changes. This is the difference between ‘Publish for Test’ and ‘Publish Version.’ You don’t need to create new versions of your app to make changes in ‘Publish for Test.’ whereas after ‘Publish Version,’ you will have to create a new version every time.
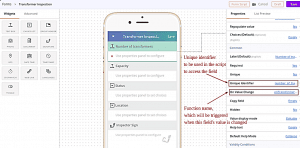
What is the Workflow Script Feature
A workflow script can be used to perform dynamic operations/manipulations in the workflow while filling the workflow from the mobile device. A workflow script can have one or more simple JavaScript functions written inside of it.
The functions need to be registered with the value change event of the fields in the workflow while designing the workflow from the Workflow Builder.
Various actions, such as automatically changing field labels/values, showing error/warning alerts, based on the values entered in the workflow, can be performed by writing in the workflow script functions, which are registered with the callback.
Sample:
function onTransformerCntChange(ws){
Var number_of_transformers = getWidgetValue(ws,’number_of_transformers’);
if(number_of_transformers > 0){
ws.setWidgetPrompt(“working_transformers”,”Out of the “+number_of_transformers+” transformer(s), how many are in working condition?”);
}
else{
ws.setWidgetValue(“working_transformers”,0);
}
ws.reloadUICell(“working_transformers”);
}
How Workflow Builder Works
The Workflow Builder allows the user to build mobile forms without writing any code. The mobile forms are created by the Workflow Builder function with the help of widgets that can be dragged and dropped to a virtual mobile screen. Widget properties can be configured to customize the widget behavior.
DataMyte Digital Clipboard Web App
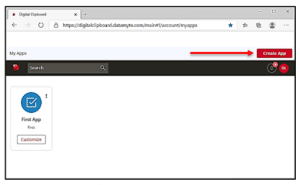
Login to your DataMyte Digital Clipboard account or create a new account if you are new.
Create DataMyte Digital Clipboard App
Click Create App in upper right
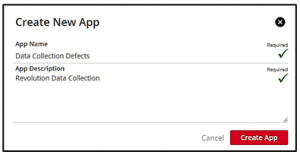
Create New App dialog displays. App Name and App Description fields are required. Enter App Name and App Description you are creating; i.e., App Name—Data Collection Defects and App Description—Revolution Data Collection. Required and checkmark display green when required fields are populated.
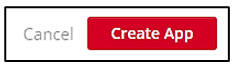
Click Create App to continue or Cancel to close without saving. Click CreateApp.
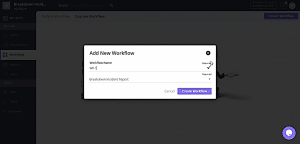
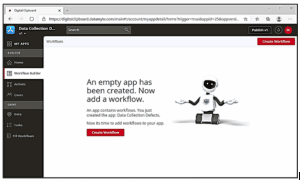
Create DataMyte Digital Clipboard Workflow
Create Workflow for the app you created
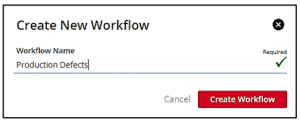
Click Create Workflow—Create New Workflow dialog displays. Workflow Name is required. Type New Workflow Name; i.e. Production Defects
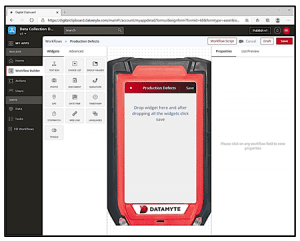
Workflow Builder window displays
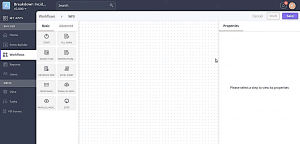
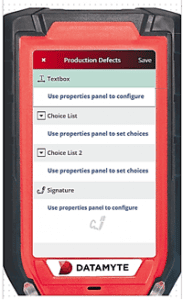
Drag and Drop Widgets on the virtual mobile screen to build your workflow; i.e. Drag and Drop Widgets—Text Box, Choice List, Choice List and Signature
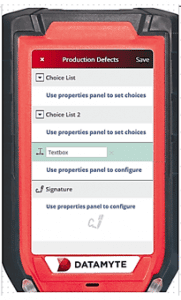
Change Widget Order—Click widget and drag and drop to a new position; i.e., drag and drop Textbox widget to a position above Signature widget
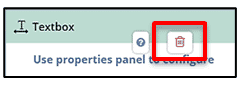
RemoveWidget—Click off the virtual mobile screen. Move the mouse cursor over the widget to remove; i.e., Textbox widget. Remove icon displays. Click Remove icon
Click Remove to continue or move the mouse off-field to cancel. Click Remove? The Textbox Widget is removed from the virtual mobile screen.
Add Textbox Widget to the virtual mobile screen as the first widget.
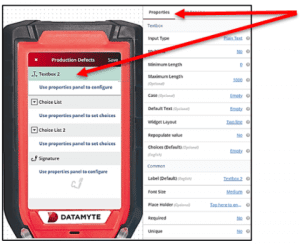
Widget Properties—Properties of each widget can be defined by setting up the values as shown on the right-hand side.
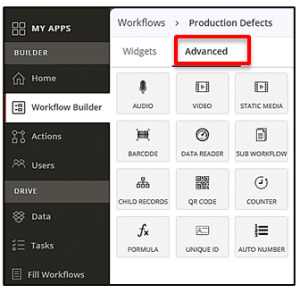
Click the Advanced tab on the left-hand side of the screen. Advanced widgets include functionality like adding a QR code or rich media files like video and audio to the workflow you are creating.
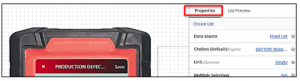
Click List Preview to display the configuration to customize the list view
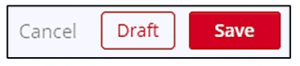
Click Save—your mobile workflow will be created. Additional options include Cancel and Draft
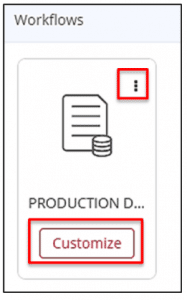
Click Customize to customize or edit the saved (Draft) workflow. Note: Click ellipses to delete workflow
Click Video icon —Tutorial displays: how to create a workflow
How to annotate a picture with DataMyte Digital Clipboard Mobile App
DataMyte Digital Clipboard image annotation is a powerful feature to report problems, locate the exact place on the image and text notes. While collecting data using DataMyte Digital Clipboard mobile app, users can capture the picture, put multiple annotations and notes against them.
This makes data collection even more effective when you have to notify the problems.


 —Tutorial displays: how to create a workflow